I am so sorry for not posting, but I have exams and I am busy studying. I’ll post again in …..2 weeks. So this is just a really quick post as well. So, I’m gonna give you the recipe for Spring Strawberries with honey and vanilla, Moscato d’Asti granita and whipped cream.
Ingredients
100ml honey
50ml water
1 vanilla bean
1kg sweet spring strawberries
250ml pure cream
For the grantia:
375ml Mosacto d’Asti
60g caster sugar
375ml water
Method
You need to make the granita a day before you plan to serve it. Combine the Moscato, sugar and all the water in a bowl. Stir well to dissolve the sugar. Pour the mix into a tray. Put it in the freezer overnight to freeze solid. When the granita is required, simply scrape the mixture with a fork to form small ice crystals.
To make the syrup for the strawberries, place the honey, water and the split and scraped vanilla bean in a small pot. Bring the mix to the boil, stirring well. Place the syrup through a fine sieve. Allow the syrup to cool completely.
Hull the strawberries and place them in a bowl. Add the syrup and set aside to marinate for 30 minutes before serving. Whip the cream until soft peaks form and place in the fridge.
To serve, place the strawberries and some of the syrup in individual serving glasses. Add 2tbsp shaved granita and top with a dollop of whipped cream serve immediately.
Do take note that the grantia contains alcohol, so it is not suitable for young children. If you want to make it suitable for children, replace the Moscato d’Asti with strawberry juice.
Saturday, October 2, 2010
Sunday, September 12, 2010
Lemon and Nutmeg Baked Custard
Hi,
I am so sorry for not posting last week but I was very busy and this is also going to be a very quick post, I have an exam in a couple of days so I am busy studying. This dessert is a quick and simple dish which should please anyone; it is warm, comforting and just like home. I hope you enjoy it.
Ingredients
250ml milk
250ml cream
Zest of one lemon in 5 strips
100g sugar
4 eggs beaten
1 small nutmeg grated, or ½-1 tsp of ground nutmeg
Method
Heat the cream, milk and lemon zest over a medium heat until nearly boiling. Turn off heat and then allow liquid to sit for 10 minutes and then strain out the zest.
Preheat the oven to 150C.
In a mixing bowl beat the sugar and eggs until evenly combined. Reheat the milk till nearly boiling and whisk it into the eggs, and then pour into individual ramekin dishes. Sprinkle with nutmeg or stir it in.
Place the dishes into a deep baking tray and pour boiling water 1/3 of the way up the side of dishes or to the level of the custard. Bake for about 15-25 minutes or until set(there is an even wobble if you wobble the pan). Serve it warm.
 So this is is for today's post. I know that it is REALLY short but it is just a really quick post. I will try and post right after my test.
BYEE
Sunday, August 29, 2010
SongPyeon & NaengMyeon
Hi guys, as I had promised yesterday, I am back today. I have also kept my other promise that I will continue on with the theme of Korean.
The weather in Australia these days is a bit warmer, seeing as it will officially be the start of Spring in just two days. And this means that it will almost be Autumn for the people in the Northern Hemisphere. Today, I will try and accommodate for both halves of the earth by introducing you guys to both spring and autumn dishes.
A traditional Korean Dish eaten during Chuseok 추석(?) (Mid-Autumn Festival) is SongPyeon (송편). It is made of chewy stuffed tteok (rice cake), honey or another soft sweet material such as sweetened sesame or black beans are used as fillings. Pine needles can be used for imparting flavor during the steaming process. It is often found as half-moon shaped, but it can be made into various shapes. I myself find that it is in many ways similar to the Japanese and Chinese mochi, because it is made from rice flour and it is also with something sweet. How to make, it is in fact very simple......
Ingredients
• Non-glutinous rice, 5 cups(making 10 cups of powder)
• Salt (15ml)
• Mugwort ssook garu (쑥가루)(?)(50g)
• Salt (1 ml)
• Gardenia seeds & omija juice (honeyed juice), as needed
* Filling
• Chestnuts 10 (200g)
• Sugar (30ml)
• Young soybeans (100g)
• Salt (1ml)
• Sesame (100g)
• Honey (45ml)
• Mung beans () 1 cup
• Honey (75ml), Salt (2.5ml)
• Cinnamon powder (15ml)
• Pine needles (300g)
• Sesame oil, as needed
Method
1. Wash non-glutinous rice 3 to 4 times and leave it soaking in water for 8 to 12 hours. Remove the soaked rice from water and sprinkle some salt and grind into a fine powder. Place the Mugwort(쑥가루) in boiling water with salt, remove and then chop into fine pieces.
2. Take the powder for the rice cake and divide into 4 parts. Leave one part as it is, another part for the Mugwort(쑥가루). As for the other two parts, mix one with water from pine endodermis, and mix the last part with omija juice and knead it to make dough.
3. Peel chestnuts and cut into 3 or 4 pieces, include some sugar and steam lightly. Take the young soybeans, peel and add a bit of salt. Wash the sesame and when dry, roast and then mix with honey. Take the red beans that have been soaked in water, boil and then grind and mix with honey, salt, cinnamon powder to make the filling.
4. Take little pieces of the prepared dough. Press your thumb into the middle of the piece to make a round, flat piece. Place enough filling in the middle, fold and press the ends to make nicely-shaped songpyeon. Next, wash the pine needles and then dry.
5. In an earthenware steamer, place pine needles on the surface of the steamer and songpyeon on top. Stack more pine needles and repeat the process to add as many layers of songpyeon in the steamer as possible. When you see steam evaporating, place the cover on top. Steam for about 25 minutes on high.
6. Next, take the pine needles out, dip songpyeon in cold water, rinse quickly and apply some sesame oil.
*hint:Songpyeon that's not yet been steamed should be covered with a thin damp cloth to prevent the dough from drying or cracking.


There you go, a summer dish for you to practice making in Spring so you have it perfected for Summer.
So, yea, that is going to be it for my post today. I hope that you guys liked it and i will be back with more to write about later in the week.
BYEE
The weather in Australia these days is a bit warmer, seeing as it will officially be the start of Spring in just two days. And this means that it will almost be Autumn for the people in the Northern Hemisphere. Today, I will try and accommodate for both halves of the earth by introducing you guys to both spring and autumn dishes.
A traditional Korean Dish eaten during Chuseok 추석(?) (Mid-Autumn Festival) is SongPyeon (송편). It is made of chewy stuffed tteok (rice cake), honey or another soft sweet material such as sweetened sesame or black beans are used as fillings. Pine needles can be used for imparting flavor during the steaming process. It is often found as half-moon shaped, but it can be made into various shapes. I myself find that it is in many ways similar to the Japanese and Chinese mochi, because it is made from rice flour and it is also with something sweet. How to make, it is in fact very simple......
Ingredients
• Non-glutinous rice, 5 cups(making 10 cups of powder)
• Salt (15ml)
• Mugwort ssook garu (쑥가루)(?)(50g)
• Salt (1 ml)
• Gardenia seeds & omija juice (honeyed juice), as needed
* Filling
• Chestnuts 10 (200g)
• Sugar (30ml)
• Young soybeans (100g)
• Salt (1ml)
• Sesame (100g)
• Honey (45ml)
• Mung beans () 1 cup
• Honey (75ml), Salt (2.5ml)
• Cinnamon powder (15ml)
• Pine needles (300g)
• Sesame oil, as needed
Method
1. Wash non-glutinous rice 3 to 4 times and leave it soaking in water for 8 to 12 hours. Remove the soaked rice from water and sprinkle some salt and grind into a fine powder. Place the Mugwort(쑥가루) in boiling water with salt, remove and then chop into fine pieces.
2. Take the powder for the rice cake and divide into 4 parts. Leave one part as it is, another part for the Mugwort(쑥가루). As for the other two parts, mix one with water from pine endodermis, and mix the last part with omija juice and knead it to make dough.
3. Peel chestnuts and cut into 3 or 4 pieces, include some sugar and steam lightly. Take the young soybeans, peel and add a bit of salt. Wash the sesame and when dry, roast and then mix with honey. Take the red beans that have been soaked in water, boil and then grind and mix with honey, salt, cinnamon powder to make the filling.
4. Take little pieces of the prepared dough. Press your thumb into the middle of the piece to make a round, flat piece. Place enough filling in the middle, fold and press the ends to make nicely-shaped songpyeon. Next, wash the pine needles and then dry.
5. In an earthenware steamer, place pine needles on the surface of the steamer and songpyeon on top. Stack more pine needles and repeat the process to add as many layers of songpyeon in the steamer as possible. When you see steam evaporating, place the cover on top. Steam for about 25 minutes on high.
6. Next, take the pine needles out, dip songpyeon in cold water, rinse quickly and apply some sesame oil.
*hint:Songpyeon that's not yet been steamed should be covered with a thin damp cloth to prevent the dough from drying or cracking.

And there you have it, a sweet and easy to make snack in Autumn which is warm and bound to please you as the weather gets colder.
And now, for the people who live in the Southern Hemisphere, how about a dish which is cool and fresh for the approach of Summer with the arrival of Spring?
I know that this recipe may be a bit too early, but it is NaengMyeon(냉면). There are two variations of the dish, mul naengmyeon (물 냉면) and bibim naengmyeon (비빔 냉면). The former is served as a cold soup with the noodles contained in broth made from beef, chicken or dongchimi. The latter is served with a spicy dressing made primarily from gochujang (red chili paste) and eaten all mixed together. In the case of bibim naengmyeon, a bowl of the soup broth used in mul naengmyeon or plain broth from the boiled noodles itself are often served on the side.
Mul naengmyeon (물 냉면)originates from Pyongyang. Pyongyang naengmyeon is mainly made from buckwheat and the broth of beef or pheasant. It also uses dongchimi broth or a mixture of it, while adding the sliced pieces of the radish to the dish. Vinegar, spicy mustard and sugar is added according to taste before eating. Because the noodles are made mostly from buckwheat, they have a less chewy texture so they rarely need to be cut before consumption.
The version of bibim naengmyeon originates from Hamhung, the hoe naengmyeon (회 냉면). Hoe naengmyeon is bibim naengmyeon with additional marinated raw fish (hoe), usually skate. It is eaten with the spicy gochujang dressing and other ingredients all mixed together. Vinegar, sugar, and sometimes sesame oil is added according to taste. The noodles of Hamhung naengmyeon are usually made from potato or sweet potato starch, so the noodles are very chewy in texture compared to those of Pyongyang naengmyeon.
The following recipe will be for both versions of naengmyeon.
Ingredients
•A package of cold noodles, onion, garlic, green onions,
•ginger, cucumber, egg, 1 bosc pear, hot pepper flakes,
•hot pepper paste, sesame seeds, vinegar, sesame oil, corn syrup,
•salt, soy sauce, sugar, mustard powder
Method
1. Make stock by boiling 8 cups of water, 3-4 shiitake mushrooms, dried kelp, and 8-10 dried anchovies (You will see how to make this stock in my soon du bu video) and cool it down.
2. Prepare toppings for naengmyeon
•Mustard powder: Mix 2 tbs of mustard powder and 1 tbs water and put it on warm place to ferment it.
•Cucumber: Slice a quarter of cucumber thinly and sprinkle a pinch of salt, 1 ts of sugar, 1 ts of vinegar, and a pinch of hot pepper flakes and mix it and set it aside
•Bosc pear:Slice a half pear thinly and soak it in water and add 1 ts sugar to protect it from changing color
•Egg: Hardboil an egg, cut it in half, and set it aside
3. Make hot and spicy sauce for bibim naengmyeon, by grinding these ingredients:
A half of peeled bosc pear, a quarter of onion (about 3 tbs), 1 ts garlic, 1 ts of ginger, ½ cup of corn syrup, 4 tbs hot pepper flakes, 3 tbs hot pepper paste, ¼ cup of apple vinegar, 1 tbs sesame seeds, 3 green onions, 1 tbs soy sauce.
Place the ground sauce into a container and add 1 tbs sesame oil and 1 ts of fermented mustard and mix it.
4. Make naengmyeon broth by mixing 1 cup of Yeolmu kimchi juice and 2 cups of stock.
5. Boil the noodles:
1.Put noodles into boiling water in a big pot (2/3 of the pot is filled with water). The direction of cooking noodles is on the back of the noodle package and it usually takes 3-4 minutes to boil after putting the noodles into the boiling water. You can take some sample to check if the noodles are cooked enough or not.
2.When the noodles are cooked, move the pot into a kitchen sink and pour cold water and remove some water and pour cold water again. This process helps the noodles get chewier.
3.Place the noodles into a basket or colander and keep rinsing and draining the noodles until all starch from the noodles are removed.
6. Serve it cold cold!
For mul naengmyeon:
•Put some noodles into a serving bowl and fill the broth until the noodles are submerged.
•Add crushed ice and place toppings: yeolmu kimchi, a few pieces of pear and cucumber, and a half side of boiled egg on top.
•Add 1 ts of mustard
For bibimnaengmyeon:
•Put some noodles into a serving bowl.
•Add a half cup of icy broth
•Place some hot and spicy sauce, yeolmu kimchi, a few pieces of pear and cucumber and a half side of boiled egg on top.
•Add some more sesame oil if you want.
There you go, a summer dish for you to practice making in Spring so you have it perfected for Summer.
So, yea, that is going to be it for my post today. I hope that you guys liked it and i will be back with more to write about later in the week.
BYEE
Saturday, August 28, 2010
Gimbap 김밥
I am really sorry that I have not blogged for the past two weeks. The two main reasons are that
1.I have been too lazy, and
2.I have actually been busy
Well, last week I was going to write up a post on gimbap because I had it last week. And to make up for not posting last week I will post something today and also something tomorrow.
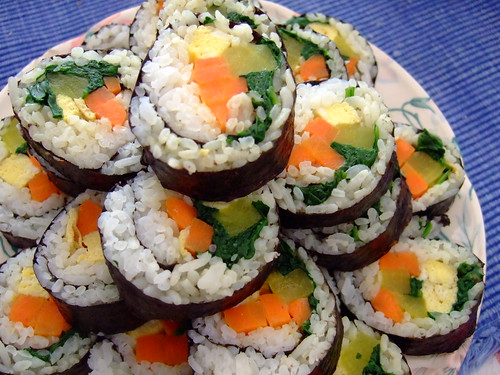
So today’s post is going to make up for last week, so the post is still going to be about gimbap. Now have you ever tried gimbap before? For those of you who have not tried it before, let me ask you another question. Have you ever tried sushi before? If you answered yes to sushi, then let me tell you, gimbap is really just the Korean version of sushi.
Gimbap often comes with cucumber, egg, danmuji (pickled radish), carrot and anything really. The name derives from, bap which is rice and gim which is the name of the dried seaweed which is used to wrap it.
There are many variations of gimbap:
Short grain white rice is usually used, although short-grain brown rice, like olive oil on gim, is now becoming more widespread among the health-conscious. Rarely, sweet rice is mixed in gimbap rice. Nowadays, gimbap's rice is much kind of black rice, boiled rice and cereals etc.
Gim is dried, pressed seaweed made from the edible species, laver. Gim may be roasted and seasoned with oil and salt, roasted but unseasoned, or raw and unseasoned. The oil used for roasting gim is traditionally sesame oil; however, today, corn and canola oils are also commonly used, especially with the pre-seasoned packs of gim sold widely in stores. Olive oil is also becoming more prevalent. For gimbap, the roasted, unseasoned variation is typically used.
Besides the common ingredients listed above, some varieties may include cheese, spicy cooked squid, kimchi, luncheon meat, or spicy tuna. The gim may be brushed with sesame oil or sprinkled with sesame seeds. In a variation, sliced pieces of gimbap may be lightly fried with egg coating.
Samgak gimbap (삼각김밥) is a triangle-shaped gimbap sold in many convenience stores in South Korea. It is derived from Japanese triangle-shaped rice ball "Onigiri" which was introduced in Japanese convenience stores in South Korea in recent years. Samgak gimbap also come in many varieties.
Chungmu gimbap is a unique gimbap made without any ingredients inside the roll. Originating from the seaside city of Chungmu, the rolls are thinner than regular gimbap and the surface is not brushed with sesame oil. Chungmu gimbap is traditionally served with side dishes of kolddugi muchim (꼴뚜기 무침), sliced baby octupus marinated and fermented in a spicy red pepper sauce, and radish kimchi (무김치).
Now, finally for the recipe of gimbap, today I will be telling you how to make a vegetarian version for two people, but feel free to add meat or fish.
Ingredients
•Laver/seaweed 4 sheets
•Steamed rice for 2 people
•4 Yellow radish strips
•3 stalks of spinach
•a carrot
•a cucumber
•6 long sticks of seasoned edible burdock root
•3 eggs
•Some sesame oil and sesame
•Some salt
Preparation (It will take about 15 minutes)
1.Cut the carrots and cucumber into long thin slices. (you need 6 sticks.)
2.Rinse the spinach and parboil it in boiled water. (For 1 minute)
3.Put the spinach into a bowl. Add 2 sprinkles of salt and 1 dash of sesame oil on spinach then mix it well.
4.Beat one egg in a bowl. Fry the egg in a pan and make the egg stick by rolling it. (It is better if you can make it thin.) Do the same with rest of the eggs.
5.Cook the carrots, crab sticks and BBQ ham in a pan with a little oil. (You can use un-cooked ones, but I prefer cooked ones.)
6.Put all the ingredients on one plate. It makes it easy to roll.
7.Add 2 dashes of sesame oil and 2 sprinkles of salt on the rice. Mix it well.
Making (It will take about 10 minutes)
1.Place one sheet of seaweed on a flat surface.
2.Put the rice on the seaweed and spread it thinly.
3.Put two burdock sticks, two carrot sticks, two cucumber sticks, crab stick, ham, yellow radish, egg stick (all one each), and some spinach in the middle of the rice.
4.Roll it. (If the seaweed doesn’t stick, paste some water at the edge)
5.Once you made rolls, paste some sesame oil and sesame onto the seaweed’s surface (just little bit) and slice them.
6.Serve it on the plate.
And there you have it, my simple version of gimbap which is yummy and easy to make. Perfect for the weather now, not too hot and not too cold.
1.I have been too lazy, and
2.I have actually been busy
Well, last week I was going to write up a post on gimbap because I had it last week. And to make up for not posting last week I will post something today and also something tomorrow.
So today’s post is going to make up for last week, so the post is still going to be about gimbap. Now have you ever tried gimbap before? For those of you who have not tried it before, let me ask you another question. Have you ever tried sushi before? If you answered yes to sushi, then let me tell you, gimbap is really just the Korean version of sushi.
Gimbap often comes with cucumber, egg, danmuji (pickled radish), carrot and anything really. The name derives from, bap which is rice and gim which is the name of the dried seaweed which is used to wrap it.
There are many variations of gimbap:
Short grain white rice is usually used, although short-grain brown rice, like olive oil on gim, is now becoming more widespread among the health-conscious. Rarely, sweet rice is mixed in gimbap rice. Nowadays, gimbap's rice is much kind of black rice, boiled rice and cereals etc.
Gim is dried, pressed seaweed made from the edible species, laver. Gim may be roasted and seasoned with oil and salt, roasted but unseasoned, or raw and unseasoned. The oil used for roasting gim is traditionally sesame oil; however, today, corn and canola oils are also commonly used, especially with the pre-seasoned packs of gim sold widely in stores. Olive oil is also becoming more prevalent. For gimbap, the roasted, unseasoned variation is typically used.
Besides the common ingredients listed above, some varieties may include cheese, spicy cooked squid, kimchi, luncheon meat, or spicy tuna. The gim may be brushed with sesame oil or sprinkled with sesame seeds. In a variation, sliced pieces of gimbap may be lightly fried with egg coating.
Samgak gimbap (삼각김밥) is a triangle-shaped gimbap sold in many convenience stores in South Korea. It is derived from Japanese triangle-shaped rice ball "Onigiri" which was introduced in Japanese convenience stores in South Korea in recent years. Samgak gimbap also come in many varieties.
Chungmu gimbap is a unique gimbap made without any ingredients inside the roll. Originating from the seaside city of Chungmu, the rolls are thinner than regular gimbap and the surface is not brushed with sesame oil. Chungmu gimbap is traditionally served with side dishes of kolddugi muchim (꼴뚜기 무침), sliced baby octupus marinated and fermented in a spicy red pepper sauce, and radish kimchi (무김치).
Now, finally for the recipe of gimbap, today I will be telling you how to make a vegetarian version for two people, but feel free to add meat or fish.
Ingredients
•Laver/seaweed 4 sheets
•Steamed rice for 2 people
•4 Yellow radish strips
•3 stalks of spinach
•a carrot
•a cucumber
•6 long sticks of seasoned edible burdock root
•3 eggs
•Some sesame oil and sesame
•Some salt
Preparation (It will take about 15 minutes)
1.Cut the carrots and cucumber into long thin slices. (you need 6 sticks.)
2.Rinse the spinach and parboil it in boiled water. (For 1 minute)
3.Put the spinach into a bowl. Add 2 sprinkles of salt and 1 dash of sesame oil on spinach then mix it well.
4.Beat one egg in a bowl. Fry the egg in a pan and make the egg stick by rolling it. (It is better if you can make it thin.) Do the same with rest of the eggs.
5.Cook the carrots, crab sticks and BBQ ham in a pan with a little oil. (You can use un-cooked ones, but I prefer cooked ones.)
6.Put all the ingredients on one plate. It makes it easy to roll.
7.Add 2 dashes of sesame oil and 2 sprinkles of salt on the rice. Mix it well.
Making (It will take about 10 minutes)
1.Place one sheet of seaweed on a flat surface.
2.Put the rice on the seaweed and spread it thinly.
3.Put two burdock sticks, two carrot sticks, two cucumber sticks, crab stick, ham, yellow radish, egg stick (all one each), and some spinach in the middle of the rice.
4.Roll it. (If the seaweed doesn’t stick, paste some water at the edge)
5.Once you made rolls, paste some sesame oil and sesame onto the seaweed’s surface (just little bit) and slice them.
6.Serve it on the plate.
And there you have it, my simple version of gimbap which is yummy and easy to make. Perfect for the weather now, not too hot and not too cold.
Tomorrow I'll come back with some more recipes, I think I will stick to the theme of Korean for a bit longer, so stay in tune.
BYEE
Sunday, August 15, 2010
Destination....Greece
Hi guys, so I am back with another blog post. This time I will be giving out some Greek recipes, these are all popular and you probably do know them. I really probably should start finding some more obscure and unknown recipes, but while I am still starting off I shall stick to some more well known ones.
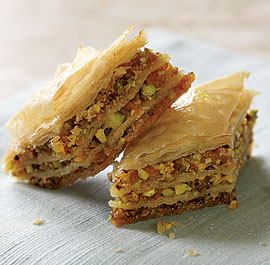
The first one is Baklava. You most likely have seen this dessert, it is the one which has filo pastry and can be disgustingly sweet (in a good way). The pastry is layered between an array of crushed nuts and the pastry. And to make the pastry as sweet as it is it is drenched in syrup or honey.
Ingredients
375g (1 packet) filo pastry
180g butter, melted & cooled
2 tsp water
filling
150g walnut pieces
150g unsalted pistachios
55g (1/4 cup) caster sugar
1tsp ground cinnamon
honey syrup
375g jar honey
165g (3/4 cup) sugar
250mls (1 cup) water
1 lemon, rind finely grated and juiced
Method
Preheat oven to 180°C. To make the filling, spread the walnuts on a baking tray and lightly toast in the preheated oven for 5-8 minutes or until aromatic. Cool.
Combine walnuts, pistachios, sugar and cinnamon in the bowl of a food processor and process using the pulse button until they are finely chopped.
Remove the filo pastry from its packet and lie flat on the work bench. Cover with a dry tea towel and then a damp tea towel. (This will keep the filo from drying out while making the baklava.)
Brush a shallow 18 x 28cm cake tin with some of the butter. Take 1/3 of the sheets of filo. Brush the top sheet generously with butter and fold into thirds to make a rectangle the size of the tin. Place in the base of the buttered tin and brush surface with butter.
Continue layering with the left over 1/3 of pastry. Spread 1/2 of the nut filling over the filo to cover. Layer 1/2 of the remaining filo sheets as before. Spread left over nut filling over filo and top with the remaining layered buttered filo sheets. Lightly brush top with remaining butter.
Using a sharp knife, cut a diamond pattern into the top layer of filo and sprinkle with the water. Bake in preheated oven for 30 minutes. Cover with foil and cook for 45 minutes longer or until the filo layers are cooked through.
Meanwhile, to make the honey syrup, combine honey, sugar, water, lemon rind and juice in a saucepan and stir over high heat until sugar dissolves. Bring to the boil and maintain over medium heat for 10 minutes or until the syrup has thickened slightly.
Remove from heat and allow to cool. When cooked, remove baklava from the oven and immediately pour the cooled syrup evenly over the surface. Stand to cool completely. Cover with foil and store at room temperature in the tin for up to 2 weeks.
Cut into diamond shapes to serve with espresso coffee or as a dessert with whipped cream.
The next recipe which I will be sharing is another popular one, it is the one for Dolmades also known as stuffed vines. Dolmades can be eaten as a meze with ouzo or as a side dish. It can also be accompanied by Greek strained yoghurt as a tasty little snack on its own. As a tip and for a perfect dish the vine leaves used should be the first tender leaves of the spring.
Ingredients
50 vine leaves – approx. 10cm diameter
2 large onions grated
½ kg risotto rice
1 bunch chopped fennel
5 fresh mint leaves chopped
Juice from 2 medium lemons
2 cups extra virgin olive oil
Salt and pepper
Method
Wash the leaves in cold water. Place them in a large pan of boiling water for no longer than a minute – just to soften them. Remove the protruding edge of the central stem from each leaf. Place the leaves individually flat in a shallow oven dish and allow to cool.
In a shallow pan, gently fry the onions in 3 tablespoons of oil. Add the remaining ingredients and stir the mixture just the once before removing from the heat.
Place 1 level teaspoon of the mixture in the centre of each leaf and fold the leaf to make a small rectangular package.
Spread 5 vine leaves at the bottom of a shallow pan and place the dolmades next to each other in the pan with the folded side underneath. When you have completed one layer, make another layer of dolmades on top of them and then finally a third layer. Add the rest of the olive oil as well as 1 cup of water.
Place any remaining leaves across the top of the layers and then place a heavy plate on top to cover most of the surface. Put the lid on the pan, bring to the boil and simmer for 30 minutes or until there is only oil and no water. Remove the plate and add the lemon juice.
The dolmades can now be removed from the pan and served.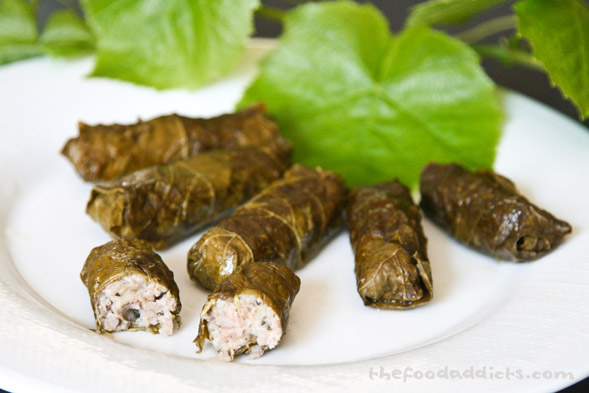 The dish is also a perfect for vegetarians because it contains absolute no meat. So how about it, a classical Greek dish for Saturday night and finish it off with the perfect Greek dessert?
That's all I have for now...
BYEE
Saturday, August 7, 2010
Chocolate Eclairs
So, I am back today with a much loved favourite, the chocolate éclair. I am a bit disappointed that I cannot continue with the previous theme of Thai food, but this morning when I was reading the "SMH Good Weekend" I cam across the food section and today they were talking about chocolate éclairs. I myself love desserts or anything sweet really, so I'm more than happy to share the recipe with your guys.
Chocolate Eclairs
Ingredients
120g plain flour
250ml milk (or water if preferred)
pinch salt
pinch caster sugar
120g unsalted butter
4 large eggs
pastry cream (recipe to follow)
optional, whipped cream
melted good quality dark or milk chocolate
decorations such as nuts if desired
Method
To make choux-pastry shells: preheat oven to 180C and shift flour
Heat the milk, salt, sugar and butter in a large saucepan. Bring to the boil and remove from heat. Add the flour and beat vigorously with a wooden spoon until the mixture is smooth and starts to pull away from the sides of the pan, forming a ball. This may take around 20 seconds.
Return the saucepan to the stove over a low heat and continue to beat it for 1 minute. Place the mixture in a bowl of an electric mixer with a paddle attachment and beat at a high speed for 30 seconds. This will take some heat out of the mixture and release steam. This can also be done by a wooden spoon.
Reduce the speed slightly and add the eggs, one at a time, allowing each to incorporate thoroughly. The finished dough should be soft and glossy.
Place the dough in a piping bag with a large, plain nozzles and pipe 9cm lengths onto a lined, greased baking tray. Bake in the oven for about 20-30 minutes or until it is golden and crisp.
Place the pastries onto a cooling rack. With a sharp knife make a tiny slit at one end to allow the steam to escape. Leave it to cool completely before filling with pastry cream.
To assemble the éclairs: take a clean piping bag with a small, plain nozzle and fill with pastry cream. Make a hole at each end of the pastry and fill with pastry cream until you can see the cream at the other end.
Dip the tops of the éclairs into the melted chocolate. You can then decorate them with anything you wish. Leave them to set on a tray but make you you eat them the day you make them.
Pastry Cream
Ingredients
300ml milk
1 vanilla bean, split and seeds scrapped
3 egg yolks
60g caster sugar
200g plain flour
200g cornflour
Method
In a saucepan, heat milk and vanilla bean on a medium heat just to the boil.
Place all other ingredients in a bowl with an electric mixer, using the paddle attachment, beat until pale and smooth.
Once the milk has boiled, remove from the heat and pour 1/3 into the egg mixture. Mix and then pour back into the saucepan with remaining milk.
Return the saucepan to a medium heat and, stirring continuously; bring the pastry cream gently to a boil. Stir for 30-60 seconds until it has thickened. Remove from the heat, pour into a clean bowl and immediately cover the surface with plastic wrap to prevent skin from forming. Leave to cool.


And there you have it, simple yet delicious and irresistible chocolate eclairs. Maybe something to try for dessert tonight, or even afternoon tea?
*thank goes to the "SMH Good Weekend" which provided the recipe
Chocolate Eclairs
Ingredients
120g plain flour
250ml milk (or water if preferred)
pinch salt
pinch caster sugar
120g unsalted butter
4 large eggs
pastry cream (recipe to follow)
optional, whipped cream
melted good quality dark or milk chocolate
decorations such as nuts if desired
Method
To make choux-pastry shells: preheat oven to 180C and shift flour
Heat the milk, salt, sugar and butter in a large saucepan. Bring to the boil and remove from heat. Add the flour and beat vigorously with a wooden spoon until the mixture is smooth and starts to pull away from the sides of the pan, forming a ball. This may take around 20 seconds.
Return the saucepan to the stove over a low heat and continue to beat it for 1 minute. Place the mixture in a bowl of an electric mixer with a paddle attachment and beat at a high speed for 30 seconds. This will take some heat out of the mixture and release steam. This can also be done by a wooden spoon.
Reduce the speed slightly and add the eggs, one at a time, allowing each to incorporate thoroughly. The finished dough should be soft and glossy.
Place the dough in a piping bag with a large, plain nozzles and pipe 9cm lengths onto a lined, greased baking tray. Bake in the oven for about 20-30 minutes or until it is golden and crisp.
Place the pastries onto a cooling rack. With a sharp knife make a tiny slit at one end to allow the steam to escape. Leave it to cool completely before filling with pastry cream.
To assemble the éclairs: take a clean piping bag with a small, plain nozzle and fill with pastry cream. Make a hole at each end of the pastry and fill with pastry cream until you can see the cream at the other end.
Dip the tops of the éclairs into the melted chocolate. You can then decorate them with anything you wish. Leave them to set on a tray but make you you eat them the day you make them.
Pastry Cream
Ingredients
300ml milk
1 vanilla bean, split and seeds scrapped
3 egg yolks
60g caster sugar
200g plain flour
200g cornflour
Method
In a saucepan, heat milk and vanilla bean on a medium heat just to the boil.
Place all other ingredients in a bowl with an electric mixer, using the paddle attachment, beat until pale and smooth.
Once the milk has boiled, remove from the heat and pour 1/3 into the egg mixture. Mix and then pour back into the saucepan with remaining milk.
Return the saucepan to a medium heat and, stirring continuously; bring the pastry cream gently to a boil. Stir for 30-60 seconds until it has thickened. Remove from the heat, pour into a clean bowl and immediately cover the surface with plastic wrap to prevent skin from forming. Leave to cool.
And there you have it, simple yet delicious and irresistible chocolate eclairs. Maybe something to try for dessert tonight, or even afternoon tea?
*thank goes to the "SMH Good Weekend" which provided the recipe
Thursday, August 5, 2010
Shahi Pulao Royal rice dish and Pad Thai
Hi guys, so I'm already back with a new recipe and more to talk about. It's still food so I am still on topic so far....so far. This time it is Thai food, and the dish is called Shahi Pulao Royal rice dish. The recipe is as follows
Ingredients
2 tbsp ghee
2 bay leaves
2 cloves
1 piece cassia bark/cinnamon
2 cardamom pods
2 cups basmati rice, washed
¼ tsp saffron strands
2 tbsp warm water
3 cups water
2 tbsp ghee
½ cup raw cashews
1 onion, sliced finely
1 small capsicum, cut into strips
1 carrot, julienned
1 tbsp garam masala
salt to taste
fresh coriander strands
Method
Heat the ghee and add the bay leaves, cloves, cinnamon and cardamom. Almost immediately, add the washed rice. Saute the rice until all the moisture evaporates.
Dissolve the saffron strands in the 2 tablespoons of warm water.
Add this to the rice, along with 3 cups of water. Cover and cook on low till all the water is absorbed (around 7 minutes).
Heat another 2 tablespoons of ghee and roast the cashews till golden brown.
Add the vegetables and stir-fry until cooked yet still crisp. Stir in the garam masala and salt. Stir this through the rice.

This looks fit to be national dish of Thailand doesn't it? YUMMM
I'll come back with another recipe in a couple of days, I hope that these keep you busy for now.
BYEE
Ingredients
2 tbsp ghee
2 bay leaves
2 cloves
1 piece cassia bark/cinnamon
2 cardamom pods
2 cups basmati rice, washed
¼ tsp saffron strands
2 tbsp warm water
3 cups water
2 tbsp ghee
½ cup raw cashews
1 onion, sliced finely
1 small capsicum, cut into strips
1 carrot, julienned
1 tbsp garam masala
salt to taste
fresh coriander strands
Method
Heat the ghee and add the bay leaves, cloves, cinnamon and cardamom. Almost immediately, add the washed rice. Saute the rice until all the moisture evaporates.
Dissolve the saffron strands in the 2 tablespoons of warm water.
Add this to the rice, along with 3 cups of water. Cover and cook on low till all the water is absorbed (around 7 minutes).
Heat another 2 tablespoons of ghee and roast the cashews till golden brown.
Add the vegetables and stir-fry until cooked yet still crisp. Stir in the garam masala and salt. Stir this through the rice.
So this dish has been said to be fit for a king, so how about it? Maybe it is somethings to try this weekend.
Another dish which you cannot possibly leave out when you are talking about Thai food is Pad Thai. Pad Thai (Thai: ผัดไทย, IPA: [pʰàt tʰāj], "fried Thai style") is a dish of stir-fried rice noodles with eggs, fish sauce (Thai: น้ำปลา), tamarind juice, red chilli pepper, plus any combination of bean sprouts, shrimp, chicken, or tofu, garnished with crushed peanuts, coriander and lime, the juice of which can be added along with Thai condiments. Pad Thai is one of Thailand's national dishes.
There have been changes to the dish by the western worlds and have made the dish more oily and heavy compared to the light and dry version found in Thailand itself. Although I have never actually myself been to Thailand to try their original version and I can see how it differs to the altered version. The recipe is as follows:
Ingredients
1/2 lime
1 egg
4 teaspoons fish sauce
3 cloves garlic, minced
1/2 teaspoon ground dried chili pepper
ground pepper
1 shallot, minced
2 tablespoon sugar
2 tablespoon tamarind
1/2 package Thai rice noodles
2 tablespoon vegetable oil
1/2-1/4 lb shrimp [Optional]
1/2 banana flower [Optional]
1/3 cup tofu - extra firm [Optional]
1-1/2 cup Chinese chives - green [Optional]
2 tablespoons peanuts [Optional]
1-1/3 cup bean sprouts [Optional]
1 tablespoon preserved turnip [Optional]
Method
Soak the dry noodles in lukewarm water while preparing the other ingredients, for 5-10 minutes. Julienne tofu and cut into 1 inch long matchsticks. When cut, the extra firm tofu should have a mozzarella cheese consistency. Cut up Chinese chives into 1 inch long pieces. Set aside a few fresh chives for a garnish. Rinse the bean sprouts and save half for serving fresh. Mince shallot and garlic together.
Use a wok. If you do not have a wok, any big pot will do. Heat it up on high heat and pour oil in the wok. Fry the peanuts until toasted and remove them from the wok. Add shallot, garlic and tofu and stir them until they start to brown. The noodles should be flexible but not expanded at this point. Drain the noodles and add to the wok. Stir quickly to keep things from sticking. Add tamarind, sugar, fish sauce, chili pepper and preserved turnip. Stir. The heat should remain high. If your wok is not hot enough, you will see a lot of juice in the wok at this point. Turn up the heat, if it is the case. Make room for the egg by pushing all noodles to the side of the wok. Crack the egg onto the wok and scramble it until it is almost all cooked. Fold the egg into the noodles. Add shrimp and stir. Add bean sprouts, chives. Stir a few more times. The noodles should be soft and very tangled.
Pour onto the serving plate and sprinkle with peanuts. Serve hot with the banana flower slice and a wedge of lime on the side and raw Chinese chives and raw bean sprouts on top.
This looks fit to be national dish of Thailand doesn't it? YUMMM
I'll come back with another recipe in a couple of days, I hope that these keep you busy for now.
BYEE
Wednesday, August 4, 2010
Sorry for the lack of posts
I'm sorry I have not been posting as frequently lately, but I have had school and a bunch of tests and assessments dues, so I have had to concentrate on that a bit more.
But, I will be trying my best to have another post on food up this weekend, so just wait a couple of days for it.
I'll see you guys later.....
BYEE
But, I will be trying my best to have another post on food up this weekend, so just wait a couple of days for it.
I'll see you guys later.....
BYEE
Saturday, July 24, 2010
Sikhye [식헤] and Samgyetang [ 삼계탕]
For this blog post I have done a bit of research ans came up with two things that are popular with Koreans in the summer, and this is also because it is summer there right now. So the two dishes are called Sikhye and Samgaetang.

Have you ever tried sickhye? Sickhye is Korean traditional beverage. It's cool to drink in hot summer and warm to drink in cold winter, too. It's sweet and really delicious. Here's some information of Sikhye
Sikhye (also spelled shikhye or shikeh; also occasionally termed dansul or gamju) is a traditional sweet Korean rice beverage, usually served as a dessert. In addition to its liquid ingredients, sikhye also contains grains of cooked rice, and in some cases pine nuts.
Preparations
Sikhye is made by pouring malt water onto cooked rice. The malt water steeps in the rice at typically 150 degrees Fahrenheit until grains of rice appear on the surface. The liquid is then carefully poured out, leaving the rougher parts, and boiled with sugar. Ginger or jujube are often added for additional flavor. It is served chilled. In South Korea and in Korean grocery stores wherever Korean communities are found, sikhye is readily available in cans or plastic bottles. One of the largest South Korean producers of sikhye is the Vilac company of Busan. Atypical of most canned beverages, each can has a residue of cooked rice at the bottom. Homemade sikhye is often served after a meal in a Korean restaurant.

Have you ever heard of Samgyetang? Koreans enjoy Sangyetang in the hot summer, because it gives people energy. It's said to be very delicious and very good for health [ I think it is becasue ginseng is added]
Samgyetang, or chicken stew, is favorite food for Koreans in the summer. An entire chicken is stuffed with garlic, ginseng, rice, and jujubes, and then boiled to make a hot delicious stew. Samgyetang is said to be a good remedy for fatigue, which is why Koreans like to eat it in the summer. Of course, Koreans aren't the only people who eat chicken stew. In the West, they eat chicken soup, which is a little different from samgaetang. The chicken is not put in whole, but in slices. Sometimes noodles and rice are also added to the soup. This chicken soup has been considered to be the perfect food that would energize them and help then bear the freezing cold.
I hope that you guys enjoyed that and I will try to come back and post soon.
BYEE
Sunday, July 18, 2010
i knew this would happen
So, in my first post I said that I would try to focus on food in this blog, but there would be a possibility of me changing the topic of my blog...well the day has already come. I know that it has only been like 2[?] days since that first post, but I have already decided to abandon that idea. Well, maybe not entirely abandon but maybe step away from it and re-visit it when I feel like it.
I'm not much of a person to blog on only one certain topic so, I guess this really shouldn't come as a surprise to me.....
Now that I think about it maybe it would be OK for me to blog about food today. This is going to relate back to somethings which had happened yesterday, it is not all that significant but it got me thinking.....I'll tell you about what I'm talking about
Yesterday I went to a friends house for a welcome back party for a friend that unfortunately had to leave Australia and go to China for school. Now, this friend of mine, Daisy, had come back to Australia for a week during HER summer holidays. So we had gone to my friends house and for lunch it turned out that we were going to eat potato and pasta bake with spaghetti bolognaise.

 I'm not saying that there was anything wrong with the food, it was delicious. But my friend's mum is Asian, yet she was able to produce such a wonderful dish that wasn't from her culture. I'm not saying that Asians aren't allowed to cook other foods if that is what you are thinking, but what I am trying to say that it is really wonderful that food from different cultures are finding there way into the kitchens of everyone, with no barriers or stoppages.
I think that might as well conclude this blogpost, but I would like to say one more thing.....This morning I had made pancakes for breakfast, but I has decided to change the batter a bit. Usually I add butter into the batter but this time I has left it out and I think that the pancakes turned out nicer than they normally do. The recipe I use now, well that one that I came up with is
I'm not much of a person to blog on only one certain topic so, I guess this really shouldn't come as a surprise to me.....
Now that I think about it maybe it would be OK for me to blog about food today. This is going to relate back to somethings which had happened yesterday, it is not all that significant but it got me thinking.....I'll tell you about what I'm talking about
Yesterday I went to a friends house for a welcome back party for a friend that unfortunately had to leave Australia and go to China for school. Now, this friend of mine, Daisy, had come back to Australia for a week during HER summer holidays. So we had gone to my friends house and for lunch it turned out that we were going to eat potato and pasta bake with spaghetti bolognaise.
I'm not saying that there was anything wrong with the food, it was delicious. But my friend's mum is Asian, yet she was able to produce such a wonderful dish that wasn't from her culture. I'm not saying that Asians aren't allowed to cook other foods if that is what you are thinking, but what I am trying to say that it is really wonderful that food from different cultures are finding there way into the kitchens of everyone, with no barriers or stoppages.I think that might as well conclude this blogpost, but I would like to say one more thing.....This morning I had made pancakes for breakfast, but I has decided to change the batter a bit. Usually I add butter into the batter but this time I has left it out and I think that the pancakes turned out nicer than they normally do. The recipe I use now, well that one that I came up with is
1 cup plain flour
1 tablespoon baking powder
2 eggs
1/4 teaspoon vanilla essence
1/2 cups sugar
1 cups milk
You combine the flour, sugar and baking powder in a bowl. You then add the eggs and vanilla essence. You combine that together a bit, and then you gradually begin to add in the milk. You may not need all the milk so, you only add as much as you need. The batter is really if it is kind of heavy and thick. When you lift a spoon out of the batter there should be a thick layer of batter on it. Also make sure that the batter looks shiny and silky, make sure that there are no clumps of flour left in the batter. You can now start to cook the pancakes, you add a bit of oil to a non-stick pan on a medium heat and then you can ladle some of the batter onto the pan. When there are bubbles all over the top you turn the pancake and let the other side cook for about 30 seconds. Repeat with the rest of the remaining batter.
You are done, a quick and yummy breakfast all ready. Some people like pancakes with golden syrup, so you can add that if you like, but I'm fine with out it, so just enjoy your breakfast

Bye for now guys, I'll blog again in a couple of days!!
Friday, July 16, 2010
Hi!
So, this is going to be my first blog post on my new blog, I've had some fun messing around with blogs before on sites such as tumblr, vox and wordpress. So this time I've decided to try and have a more serious blog......and this time I think that I am going to have a theme...FOOD!
This is going to be pretty interesting seeing as I live in Australia and even though we are a very multicultural country - the population has a very large non-Anglo background, we don't seem to be all that willing to accept new foods from cultures that easily.
I'll be getting a lot of info and stuff from newspapers, the Internet, and magazines because I'm pretty limited with what I can do......[I'm just a high school student- so there are quite a lot of things that I can't do]
I guess that my main focus will be on Asian food.......I'm from an Asian background so I guess that that will be able to assist me, but I would like to be able to focus on a particular area within that and that is KOREAN. I'm pretty much very into Korean food, especially how a lot of the food tends to be a bit spicy.
I think that is enough for an introduction, don't you think so? I'll try to blog often about food...but I do have to say that you shouldn't be too surprised if I go from blogging about food to some other topic......I'm just like that
BYEE
Subscribe to:
Posts (Atom)