Wednesday, November 28, 2012

Double Serving of Chocolate

It has been a while since I have posted but I have been sick since Sunday so....things have been a little slow. Today I'm going to be posting up two recipes that I used recently. They are partly mash-ups of things from the internet and also partly my creations.

I wrote down my recipes ages ago, and just happened to use both of them recently. They are both chocolate recipes hence the title of this blog post. I hope that you guys will enjoy it.

The first recipe is a good old favourite for dark chocolate brownies. The dark chocolate helps to create a more intense chocolate flavour and makes the brownies even more addictive than you would think. There isn't much I can say apart from tell you that this is an original recipe, I think.....Anyways, let's get started

Ingredients
250g butter
400g dark chocolate
80g cocoa powder
150g plain flour
1 teaspoon baking powder
360g sugar
4 eggs

Method
1. Preheat an oven to 180 degrees Celsius.
2. Melt the butter and 300g of the chocolate.
3. Add in the eggs to the chocolate and butter mix when it has melted and mix till smooth.
4. Add the cocoa powder, flour, baking powder and sugar to the chocolate mixture. Mix till smooth.
5. Chop up the remaining 100g of chocolate and stir into brownie mixture. (In this step you can also add other chocolate varieties and nuts of you wish)
6. Pour into a rectangular tin and bake for about 40-50 minutes or until the centre springs back.
7. Cool for 20 minutes before cutting and serving.

And there you have it, my version of brownies. You may find that you get a more sponge-y brownie than usual this way, but that is how I like my brownies. If you want the centre to be more fudge-y you can always decrease the amount of flour to about half.


My next recipe is something that I made recently upon a friends request to re-taste my baking. This recipe is going to be for my version of soft chocolate cookies. There isn't much to it, I can't remember where I got the inspiration from but I have made my own changes to it as well. But here goes

Ingredients 
250g softened butter
1 1/2 cup sugar
2 eggs
2 teaspoons vanilla extract
2 cups plain flour
2/3 cup cocoa powder
3/4 teaspoon baking powder
200g milk chocolate

Method
1. Cream the butter and sugar until light and fluffy.
2. Add the eggs in one at a time and then beat until well mixed.
3. Beat in the vanilla.
4. Combine the flour, cocoa powder and baking powder in a separate bowl.
5. Melt 100g of the chocolate.
6. Combine the butter mixture, dry ingredients and melted chocolate. Mix well.
7. Leave dough covered in the fridge for an hour or until easily handled.
8. When ready to bake preheat oven to 180 degrees Celsius.
9. Roll tablespoonful sized balls of dough and then slightly flatten them.
10. Bake the cookies for about 15 minutes or until the edges are firm.
11. Whilst cookies are baking, melt the remaining chocolate with about 40ml of water. Mix until smooth.
12. When the cookies are done take them out and let them cool on a wired rack.
13. When the cookies have cooled decorate with the melted chocolate. You may need to reheat the chocolate.

And then you are done. You can decorate the cookies anyway you want, I opted for a squiggly pattern on the cookies.


And there you have it. Here are my two chocolate-y posts today. I hope that you guys will get enough of your chocolate fix from these two posts. And maybe one day I will film myself making these goodies. But until I blog again I hope that you stay safe, happy and most important of all healthy.


Wednesday, November 21, 2012

Spicy Chicken Skewers 닭꼬치 Dakkochi

Hi there. I'm back with another blog post because it seems that I just have a lot of time these days. Not much has been happening in my life really, but I do start my job in about 2 weeks so there may be a slow down of posts depending on when I have to work. Or there may be no change. We shall see what happens.

I've decided to come back with a Korean favourite today. You can make it at home or you can buy it from street vendors, it is a popular dish with all ages because it encapsulates the Korean cravings for spicy food. It will be a nice inclusion in your meals as the days are getting colder in the Northern hemisphere and where I am it still doesn't feel like summer yet.

The dish that I am talking about is dakkochi or 닭꼬치 which is spicy chicken skewers. Pieces of chicken are brushed with a slightly sweet red sauce while being grilled over an open flame. The result is a tender, juicy treat bursting with flavor. And is is so simple that you will be able to replicate it at home. You may not be able to exactly replicate the smoky flavour of the skewers found in street vendors at home, but the taste will still be delicious regardless.

And now to get on with the recipe:

Ingredients
500g chicken, preferably from the drumstick
1 tablespoon minced garlic
pepper
salt
3 tablespoon milk
Marinade
1 tablespoon tomato ketchup
3 tablespoon water
3 tablespoon chilli flakes (you can adjust this)
2 tablespoon gochujang (you can adjust this)
2 tablespoon soy sauce
2 tablespoon brown sugar
1 tablespoon sesame seeds
1 tablespoon parsley

Method
1. De-bone and remove the skin of the chicken and chop it into bite-size pieces or the size you want for your skewers.
2. Marinade the chicken in the salt, pepper, garlic and milk.
3. To make the spicy marinade mix all of the marinade ingredients together in a bowl.
4. When ready to cook, make the chicken skewers. You can decide how many you want.
5. Preheat an oven to 180 degrees Celsius and then add the skewers.
6. Coat each skewer in the marinade just before you put it in the oven.
7. Continue to brush marinade onto the skewers in 5 minute intervals as they cook in the oven.
8. Bake for about 20 minutes or until cooked whist rotating the skewers.
9. Take it out and garnish if you wish.

And there you have it, simple make at home dakkochi.


This will be it from me today, I hope that you guys will enjoy the recipe. Remember to stay safe, happy and most important of all healthy until I blog again. 


Saturday, November 17, 2012

Soft Chocolate Pudding

Yea...so it has been more than a day. But better late than never?

I'm not going to be posting a Korean dish today. I felt like doing a good old chocolate dessert that we will all love. I'm going to be sharing with you today my version of a soft chocolate pudding. The centre and runny and chocolate-y whilst the 'crust' around it is soft and delicate.

There is not much that I can say about it without showing blogging to you. So let's get started;

Ingredients
1/2 cup  butter, plus some for buttering the molds
150g 85% dark chocolate or you can go for less intense such as 70% (try and use good quality chocolate)
1 tablespoon cocoa powder
2 eggs
2 eggs yolks
1/4 cup sugar
1/4 cup flour, plus more for dusting

Method 
1. Melt the chocolate and butter in a bowl over a pot of simmering water. But ensure that the base of the bowl does not sit in the water. Stir it as it melts to get a smooth and shiny mixture.
2. Beat the sugar, egg and egg yolks until it is light yet thick.
3. Beat the chocolate and egg mixtures together whilst the chocolate is still hot and runny.
4. Quickly FOLD in the flour and cocoa powder until just combined.
5. Butter and then lightly flour 4 ramekins.
6. Divide the batter evenly between the ramekins.
7. Preheat the oven to 240 degrees Celsius and bake the ramekins in a hot water bath for about 6-8 minutes. The centre should still be soft, but if it is too soft for your liking then bake it for 10 minutes.
8. Invert the ramekins onto serving plates and let it sit for 10 seconds. (or leave in ramekins)
9. Serve hot with whipped cream or ice cream.

And there you have it a delectable dessert that you can serve up as the nights are getting colder or as the days are getting warmer. It is the perfect dessert to serve all year around.


I hope that you guys will enjoy this chocolate-y recipe that will be sure to fatten you up before Thanksgiving and right before Christmas. It is a good dessert to prepare you for for the festive season. 

This will be it from me today, I hope that chocolate is up your avenue, if it is not I'll be sure to post a similar dessert minus all the chocolate soon. I hope that you will all stay safe, healthy and most of all happy until my next post. 


Thursday, November 15, 2012

Bbopki 뽑기

Hey guys, I seem to be taking more than a week to upload a new blog post these days. I'm really sorry but the time kinda just blurs now because I no longer have to go to school or do anything really. But I am back with a new post today ^^

I think I will be posting about a sweet recipe today. It isn't really a dessert but more of a snack.... You may have seen it before if you have watched Family Outing (I know it is super old, but it is so nice)

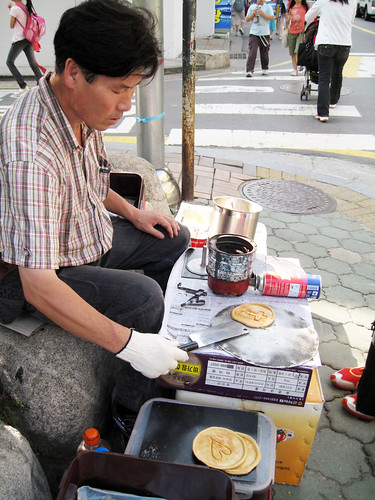
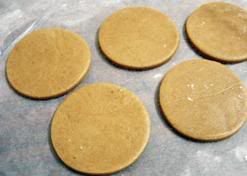
It is a traditional Korean candy made of carmelised sugar and a pinch of baking soda, bbopki (뽑기) is usually formed into round disks or molded onto a stick as a lollipop. You can find it at food stalls on streets, but honestly it is so simple there is no need for it.


Usually you will just see the vendor making bbopki sitting over a hot plate on a table. Many bbopki vendors stamp the candy with a design or shape, and if you manage to eat around the shape without breaking it, then you can get another bbopki for free (you can watch the EatYourKimchi video with bbopki in it too) The candy tastes like a slightly burnt campfire marshmallow, and it's very sweet.

It is a super simple recipe so I will probably post something tomorrow as well. But here we go -->:

Ingredients
Sugar
Baking soda

Utensils
Foil
Metallic scoop (it will get burnt so set one aside for this)

Method
1) Add a desired amount of sugar to scooping thing. Just don't have so much that when you stir the sugar it over flows. I usually go for 2 table spoons.
2) Place the foil sheet on a table.
3) Turn on your stove.
4) Place the scoop above the flame to let the sugar heat up.
5) Stir the sugar with a wooden chopstick as the sugar begins the melt turning into caramel.
6) When the sugar has completely melted into pure liquid (but is not burn) get a pinch of baking soda and add it to the sugar liquid.
7) Place the scoop back on to the fire and stir the liquid.
8) Stir as you see that the liquid starts to become the color of a caramel.
9) Take the scoop off of flame and quickly pour the substance on the foil.
10) You can now make it into a lollipop or a flat piece of candy.
11) To make a lollipop you can place a paddlepop stick inside the bbopki
12) To make flat bbopki place another piece of foil above the bbopki and flatten it (but not too flat,let it be about 3mm)
13) Wait until bbopki is hard enough to remove from foil

And there you have it, a sugar dessert that is just glorified caramel.


I hope that this will be a fun yet quick recipe that you will want to try out. It is one of the most simple snacks ever, but I guess there will always be the risk of burning your caramel, but remember that practice makes perfect.

That is it from me today, but like I said above I will try and post another recipe post tomorrow because this one was so simple. Until then remember to stay happy, healthy and safe.

Wednesday, November 7, 2012

Beef and Kimchi Pepper Rice | almost Pepper Lunch|

Hey guys, I finished all of my exams yesterday and I am back from a day of shopping to bring you a new blog post. I hope that you guys will enjoy this, and I really loved the idea of sharing this because I had something similar at lunch.

The inspiration for today's recipe comes from today's lunch which was at Pepper Lunch. They are really awesome and you should check out one of their stores if there is one near you. I don't work for them and this recipe is based solely on my own experience and ideas.

So the main idea that is reoccurring in all the dishes from the store is that there will be raw meat and rice that is brought out on a hot plate so you have to 'cook' it yourself. It is practically do it yourself teppanyaki.

And now to my version of this dish... I don't know if this will work because I can't try it out at home (no hot plates.... :( ) If you have tried this please do comment below and tell me how it went and whether I should change anything.

Ingredients
200g of beef skirt sliced thinly (any lean cut will do)
1/4 can of corn kernels
1/2 tsp of crushed pepper (not ground)
1/4 tsp salt
1 tsp cooking oil
1 tsp butter
2 tsp chopped spring onions
1 cup cooked rice

Method
1.  Make sure that the beef is entirely thawed and sprinkle salt and mix.
2.  Oil a hot plate and heat it until there is smoke
3.  Put the rice in the middle of the plate while still hot.
4. Turn off the heat and scatter the meat around the rice forming a ring around the rice.
5. Top the rice with the butter (this is the key to a tasty meal)
6. Then top with the corn, pepper and spring onions.
7. Serve immediately

NOTE: 
- I know you want to eat it but please do be careful because it is VERY hot at the beginning. And don't forget to hurry up and mix the dish up because the meat will burn and stick.
- I think that if you don't have a hot plate you could try and use a wide bottom Korean stone pot, like one used for dolseotbap. It should be able to work the same.

And there you have it, my take on the popular pepper rice dish.


AND if you want to try it with kimchi then cut up 1/2 cup of kimchi and put it on top of the rice after the corn.
(all images are taken by me) 
And there you have it, a at home version of the popular Pepper Rice dish.

I hope that you enjoyed the post because I certainly had fun writing it as my first post after I finished my exams.

Hopefully you guys will stay healthy, happy and safe until my next post.