Wednesday, February 27, 2013

닭갈비 Dak Galbi

Hey guys, so it has been a while since I have lasted posted a recipe and I'm really sorry but things have been really hectic with uni about to start next week and me just freaking out about it in general. This may be the last post in a while, so regular posts may not occur until I have settles into uni, but I won't ever stop posting that's for sure.

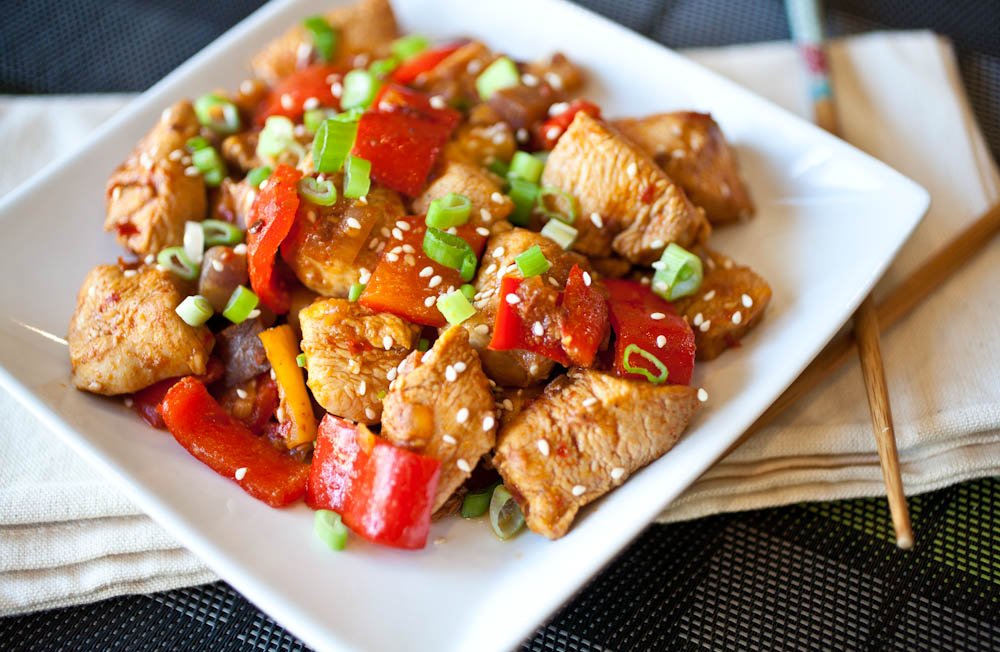
Today I'm finally going to post up a recipe that is a very popular dish in Korea, and I can't believe that I have never posted about it before. As you can tell from the title the recipe is going to be of dak galbi (닭갈비)

It is said that dak galbi appeared after the late 1960s as an inexpensive anju (food that is eaten while drinking) in small taverns, on the outskirts of the cities to replace the comparatively expensive gui dishes which are grilled over charcoal. The dish has spread to the main districts of Chuncheon, where the livestock industry thrives and offers fresh ingredients with no need for refrigeration. There is a street known as dak galbi golmok (dak galbi alley) which has a high concentration of dak galbi restaurants

That's the history of the dish, I think that it is about time that I get on with the recipe:

Ingredients
6-8 chicken thigh
1 cup milk
1 tablespoon rice wine
salt and ground black pepper
1 tablespoon olive oil
1 heaping tablespoon gochujang
4 tablespoons gochugaru (chilli flakes)
6 tablespoons soy sauce
1 tablespoon oyster sauce
4 tablespoons sugar
2 tablespoons minced garlic
1 tablespoon sesame oil
4 tablespoons rice wine (sake) ground black pepper
2 cups broccoli, cut into bite sizes
1/2 onion, sliced
1 red bell pepper, seeded and sliced thin cooked rice

Method
1. Place thawed chicken thigh in bowl. Pour the milk over the chicken and set aside for 20 minutes. Drain milk.
2. Add 1 tablespoon rice wine evenly on the chicken. Season with salt and ground black pepper.
3. Heat oil in large pan. Add onions, broccoli and red bell pepper and stir well over high heat, about 3-5 minutes.
4. Add the chicken, brown chicken on both sides, but not cooked thoroughly at this point.
5. Make sauce by combining gochujang, gochugaru, soy sauce, oyster sauce, sugar, garlic, sesame oil, rice wine, and black pepper.
6. Add the sauce to the pan with chicken.
7. Cut the chicken into bite sizes using kitchen scissors, stirring occasionally. Continue to cook, stirring occasionally, until the chicken is cooked through.
8. Add cooked rice to the pan when you’re almost done with the chicken and stir together, if desired.

And there you have it, irresistible dak galbi to share with family and friends or to eat by yourself. The perfect balance of spice, sweet and everything nice.


I hope that you like that recipe, it is quite nice and you can always adjust the level of spice that you like. It may be a while before I post a blog post up again, but I will try to make time in my week (if not once a week then once a fortnight) So until next time I hope that you stay safe, happy and healthy. And to other people in the same shoes as me I wish you the best of luck!! 

Saturday, February 16, 2013

Korean Red Bean Doughnut 풀빵 Pul bbang

Hey guys, so today is the last day of my blog spectacular that involved desserts such as apple crumble and japgwapyon and Valentine's Day specials such as breakfast smoothies, a tandoori chicken salad entree, pesto chicken kiev main and a creme brulee panna cotta dessert. So please do check out those other posts from this week.

Today is the last day of my blog week, and I have enjoyed it like I always do. I really do need to blog more often, it is a nice was to de-stress and get creative but I have a slight issue with procrastination...ok it's a pretty big issue, but I'm working on it.

To top off the week I'm going to be introducing you to another Korean dessert, as I had promised yesterday. Pul bbang (풀빵) is a Korean pancake dumpling, usually stuffed with sweetened red bean paste (팥 앙금, patanggeum). You could call them Korean filled doughnuts.

The Japanese have their own version of pul-bbang, called takoyaki. It is stuffed with boiled, chopped octopus. Takoyaki batter also is savory and other than the shape I don't really see a resemblance between the two.

Pul-bbang is sold on the street in most major Korean cities. But they're more difficult to find than their more famous cousins, boong-uh-bbang (붕어빵),which are a red bean–stuffed bread shaped like a fish.

I think that is enough for the history of the bread, it is about time that I get started in the recipe.

Ingredients
1 cup rice flour
1/4 teaspoon salt
2 eggs, beaten
1 teaspoon baking powder
1 cup milk
1 cup sweetened red bean paste (the stuff from the can will do fine)

Method
1. Mix all the ingredients for the batter until smooth.
2. Set a round doughnut pan on medium heat. HINT: you can put your doughnut maker to use or you can use a small cupcake tin in the oven)
3. Place approximately 1 tablespoon of batter into each well of the pan. I used a two spoon technique to scrape and drop the red bean paste into the batter.
4. After you have filled all the wells with batter, immediately start placing the 1/2 teaspoon of the filling e in the middle.
5. Add another tablespoon or so of batter to the top to cover the filling.
6. Let the dumplings cook for a couple of minutes.
7. Turn each dumpling over after you notice bubbles in the batter and slight pulling away on the edges.
8. Cook for a few minutes more on the other side. From there, you can flip them alternating until they are golden brown on both sides.

And there you have it, a delectable Korean dessert that is sure to please all ages, from young kinds to the oldies.


I hope that you all found that as a fitting way to end the blogging week. I will be back soon with more recipes, Korean to clarify for those of you wanting more Korean recipes. 

I hope that you all enjoy your weekend and until next time remember to stay safe, healthy and most important of all happy. 

Friday, February 15, 2013

Apple Crumble

I'm back with another recipe today......I'm nearing the end of this blogging week. It's been fun but coming up with recipe has been a bit hard when I have been busy.

I really should do this more often though, it pushes me to create new content for the blog. Also in other news I am nearing 100 blog posts, I really should do something AMAZING for my 100th blog post.....I'll try and have it figured out my then. Hopefully.

So, today's blog post I think I'll do something that is sweet, after all I'm in a sweet mood these days. I feel like something that is a classic and heart warming.

Apple Crumble. That is what today's recipe is going to be. I know that I have been doing a lot of western recipes this week, but I promise that for tomorrow I am going to blog a Korean recipe.

The humble apple crumble, something that we all saw on our dinner tables a couple times a year.There isn't much to be said about this recipe other than that it will always be loved for it's soft apples and crunchy topping. I hope that you will like this recipe of it, and let's get started!!

Ingredients
4 green apples
1 lemon, juiced
4 tbsp caster sugar
90g plain flour
40g cold butter
65g caster sugar
1 tbsp brown sugar
handful of desiccated coconut

Method
1. Preheat an oven to 190˚C. peel and chop the apples.
2. Place into a microwavable bowl and mix with the lemon juice and 4 tbsp sugar.
3. Microwave for 4 minutes on a high setting to soften the apples.
4. Pour into an oven proof baking dish.
5. Rub the butter and flour in a clean bowl and rub together with your fingertips until the mixture resembles breadcrumbs.
6. Add the caster sugar, brown sugar and desiccated coconut, then stir together.
7. Sprinkle over the fruit.
8. Bake for 25 minutes until golden brown and the fruit is bubbling.
Serve hot with cream or ice cream.


And there you have it, a scrumptious apple crumble that is to die for any time of the year.

I hope that you enjoyed that recipe because I know what I'm going to be having for dessert tonight. Until tomorrow remember to stay happy, healthy and safe.


Thursday, February 14, 2013

Valentine's Day Breakfast Smoothies

Sup people, so today is VALENTINES DAY!!!!! So you've already got all the dishes ready for your three course meal right? You haven't? Well check out my three previous blog posts for an entree, main and dessert.

To really tops things off I decided that I should also teach you how to make a drink that you can use during the night, so something that you can drink after dessert. Night cap? I don't think that's the right word....but something that you can drink after dinner.

This is going to be something light and fruity, perfect to make you feel healthy after that large Valentines day meal. In fact you can also serve this for breakfast in bed...you can still make it in time as long as you are behind Sydney in time zones, in other words practically the rest of the world.

I'm going to be showing you how to make 2 different fruit smoothies, one that has a refreshing zing, whilst the other is a nice summer one.

The first one will be a cucumber, kiwi and apple smoothie (summer) and the next one is a lime, apple and pineapple smoothie (refreshing)

So I guess it's time to get started:

Ingredients 
Cucumber, kiwi and apple smoothie 
½ small cucumber
1 apple
1 kiwi tiny knob of fresh ginger
few cashews
small glass of apple juice
pinch of salt
dollop of natural yoghurt
extra chopped kiwis (optional)
Lime, apple and pineapple smoothie
½ small lime
1 apple
3 rings of a pineapple (1/2 cup)
1 scoop of vanilla ice cream OR some yogurt
2tbs honey
pineapple rings cut in half (optional)

Method
Cucumber Kiwi and Apple Smoothie
1. Peel the kiwi and ginger, core the apple and roughly chop all three.
2. Chop up the cucumber. 
3. Whiz everything in a blender or juicer until smooth
4. Done, serve with some chopped kiwis on top.
Lime, apple and pineapple smoothie
1. Core and peel the apple and roughly chop it up.
2. Place all ingredients in a blender and squeeze in half the lime, whiz until it is smooth.
3. Serve in a glass with the pineapple on the edge of the glass.


I hope that you will all like these refreshing smoothies because they are really great for your body, packed with vitamins and antioxidants that will make your skin shine. 

Hopefully you will all have a great Valentine's Day, whether you are alone or in a couple, and that you are most important of all happy. I'll be continuing on with the rest of my blog week, and I look forward to posting up more interesting recipes for you all to follow. 

Wednesday, February 13, 2013

Valentines Day: Crème Brûlée Panna Cotta

Hey, today is the last day before Valentines Day......so it's also time for me to complete my three course meal with a dessert.

The dessert is a classic that isn't as hard as it may seem. The flavours are perfect for topping off this special day, and I'm sure that you will just feel really sweet, even without dessert.

Anyways, I should tell you what the dessert is gonna be. The dessert is going to be crème brûlée panna cotta. Bet you didn't see that twist coming did you? You thought it was going to be crème brûlée, nope it will be the panna cotta version that is slightly more foolproof.

There isn't much to tell you about the dish other than that it is absolutely delicious.

So here is to a perfect day, the perfect dessert:

Ingredients
1 1/2 cups cream
1 1/2 cups milk
1 vanilla bean
1/2 cup caster sugar
2 1/2 tsp gelatine powder
125g caster sugar
2 tbs water

Method
1. Put the water and 125g of caster sugar into a saucepan and bring to a boil, but do not stir. Take the caramel off the heat just before it starts to burn, and pour it into the bottom of your serving glass (ramekin/tumbler,wine glass etc), and let it lightly coat the bottom.
2. Place the cream and milk in a saucepan.
3. Use a small sharp knife to split the vanilla bean lengthways, then scrape the seeds from inside the bean. Add the seeds and bean to the saucepan.
4. Slowly bring to the boil over a medium heat. Remove from the heat and set aside for 10 minutes.
5. Discard bean from cream mixture. Add remaining sugar and return to a low heat. Cook, stirring, for 5 minutes, or until sugar dissolves.
6. Place 2 tbs of boiling water in a small heatproof bowl. Sprinkle over gelatine. Bring a small saucepan of water to boil. Remove from heat. Sit the bowl of gelatine in the water and stir until dissolved. Cool slightly, then stir into the cream mixture.
7. Pour the cream mixture on top of your caramel base. Refrigerate for 4 hours.
8. To serve, break the seal by inserting a small knife between the panna cotta and the mould. Turn onto a serving plate and shake to release. Top with cream, berries, nuts anything of you choice.


And there you have it, a simple dessert that has a twist on it to ensure that you have an amazing end to your Valentines Day 3 course meal.

I hope that you have all enjoyed this series of three course meal for Valentine's Day, and I will be back with more recipes throughout the week to complete my blogging week.

So until tomorrow remember to have fun cooking, have lot's of fun with the people you love tomorrow and just remember to not do anything you will regret the next day.

Tuesday, February 12, 2013

Valentines Day Pesto Kiev with Potato Mash

Sooooo, 2 days out from Valentines Day for everyone and today I'll be posting up the 3rd recipe for the week. The main course for your three course Valentines Day meal :)

I had a bit of a dilemma thinking about what to post as I wasn't sure whether or not I wanted something simple and classic such as pasta or something more adventurous......

I think I'll settle for something that is a classic and foolproof but with a slight twist so that your Valentine will always remember your amazing meal. So everyone knows that stuffed chicken breast is a classic favourite, today I'm not going to go with the classic kiev style stuffing, I'm going to be putting a twist on it.

So I guess I'll just get started with the recipe;

Ingredients
2 chicken breasts
2 rashers of bacon
150g grated cheese
6 tbs pesto
30g butter
2 tbs chopped chives
2 tbs minced garlic
salt and pepper
Mash
750g potatoes
125ml hot milk
Salt and pepper

Method
1. First off make an incision in the side of the chicken breast, along the length of it to create a pocket.
2. Next make your kiev stuffing, combine the butter, chives, garlic and season with salt and pepper.
3. Distribute even quantities of the kiev stuffing into the chicken.
4. Then add 2 tbs of pesto into each chicken breast.
5. Stuff all the stuffing in before adding a handful of cheese to fill out the pocket.
6. Rub the remaining pesto onto of the chicken breast to marinate it.
7. Wrap the rasher of bacon around the chicken to seal the opening of the stuffing and secure with a toothpick.
8. Sprinkle more cheese on top of the bacon.
9. Place the chicken into the oven at 200C for 30 minutes, or until it comes out cooked and slightly golden.
10. Make the mash, whilst the chicken cooks. To make mashed potato, place unpeeled potatoes in a medium saucepan and cover with cold water. Bring to the boil over high heat. Reduce heat to medium-high and gently boil, uncovered, for 30 minutes or until soft.
11. Drain potatoes. Set aside for 5 minutes to cool slightly. Peel and return to pan. Use a potato masher to mash until smooth. Add half the hot milk and use a wooden spoon to beat until combined. Beat in remaining milk and season with salt and pepper.
12. The chicken will has rested and the mash will be steaming hot and you are ready to serve with a side of salad or pasta.

And there you have it, a unique main course for your Valentines Day meal that puts a twist on a classic favourite with new flavours.


I hope that you guys will like that recipe :)

And I really do want to start filming some of these recipes so I will be trying my best to get at least one recipe up soon, and I really do want to film this one. So possibly some time this weekend you will see this recipe being made into a video,  bit too late for Valentines Day this year, but not too late for next year. 

Don't forget that tomorrow my recipe for Valentines Day dessert will be coming out, so stay tuned for that and I will see you guys tomorrow. 

Monday, February 11, 2013

Valentines Day Warm Tandoori Chicken Salad

Hey guys, so I'm back with day 2 of my Valentines Day weekly lead up. I'm pretty happy with myself for even actually being bothered to blog, I have been really lazy over the last month.

So I have decided that I will continue with the Valentines day theme and today I am going to post up an entree, tomorrow will be a main and then on the 14th I will be posting up a dessert, So that you will have a three course meal at your disposal for use on Valentines day with your SO. Maybe next year I should start this earlier....

Anyways, today I'm going to show you guys how to make a Warm Tandoori Chicken Salad. I had one of these at a formal dinner once (not for Valentines Day though, I haven't had the privileged of being to one of those just yet) and it was absolutely AMAZING.

With Sydney cooling down for the week and the rest of the world caught up in a cold snap, Nemo anyone? I thought that it would be a good idea to have something warm as a starter, just so you aren't shivering until the main meal.

This may seem like a really difficult dish to make but there isn't much to it, it is super simple and I am quite proud of it because it is something that I have made up entirely by myself.

I guess we should get started with the recipe:

Ingredients
2 chicken breasts
1/4 cup tandoori curry paste
50g natural greek yogurt
1 T olive oil
Salad
1 cos lettuce
1 red onion
100g spinach leaves
1 cucumber
1 tomato
1/2 carrot
Parmesan Cheese
Dressing
Juice of 1 lime
2 T olive oil
1 T brown sugar
pinch of paprika
Salt and pepper

Method
1. Cut the chicken into strip
2. Marinate the chicken in the tandoori sauce, yogurt and oil for an hour before cooking
3. Whilst the chicken is marinating prepare the salad. Place a couple of leaves of cos lettuce on each plate and top with a bit of the spinach. Cut the onion, tomato and cucumber into slices and arrange those on top too. Grate the carrot and sprinkle on top.
4. Heat up a pan and drizzle with a bit of oil before placing the chicken in and cooking until it is done and slightly crispy.
5. Arrange the chicken on top of the salad whilst still hot.
6. Shave a bit of parmesan on top of the chicken.
7. Quickly mix the dressing ingredients before drizzling on top of everything right before serving,

And there you have it, a warm tandoori chicken salad that is bound to impress as an entree for Valentines Day or any other day of the year for that matter.


I hope that this entree will impress your date for the night, and please to do come back tomorrow because I will be posting up a recipe for the main course. 

Until tomorrow keep on looking for your Valentine because I'm sure they are out there somewhere otherwise search my site for some other comfort food. 

Sunday, February 10, 2013

Fruit and Nut Rice Balls 잡과편 Japgwapyon

So it has been a hell of a long time since I have posted a recipe on this blog, and I'm really sorry. But life has been busy, I've had to work, finalise some things for uni and the main reason would be because I was going away for a couple of days and needed to organise all of that. But I'm back now and I'm going to try and post as much as I can.

Maybe I should have a week of blogging like I used to do. Should I do that?

I should probably do it, I'll start with TODAY!!!!

I guess that this blog post will mark my return to food blogging because I honestly think that it has been a month since I have lost blogged, and I hope that no one thinks that I have stopped, I've just been way to lazy.

So today I was thinking of posting a recipe for something sweet, as a lead up to Valentines day. This week might turn out to be a week of desserts......

Anyways, today's recipe is going to be a Korean dessert that is made from glutinous rice flour, fruits and nuts. Japgwapyon or 잡과편 is something small that can be brought out to the table when guests arrive, they look great and taste amazing. And it will be sure to impress your Valentine if it is wrapped up nicely in a box.

And this year it is the perfect time to make these because the Lunar new year and Valentines day are so close together.

I think that the intro has been long enough, let's get started with the recipe:

Ingredients
2 cups glutinous rice flour
2 dried persimmons
10 chestnuts, boiled and peeled
4 dates
4 Tbsp pine nuts, chopped roughly
3 Tbsp honey
1 tsp salt

Method
1. Dice the chestnuts.
2. Cut or scrape the seeds from the dried persimmons and dates.
3. Finely chop the persimmons and dates.
4. Pound the seeds with a pestle (in a mortar).
5. Mix the seeds with the chopped persimmons, dates, chestnuts and pine nuts.
6. In a mixing bowl, add the salt and about 3/4 of a cup of water to the rice flour.
7. Add a few more tablespoons of water if it seems too dry.
8. Knead dough into 1 inch rounds.
9. In a medium pot, boil the rounds and then rinse in cold water. When they float, the rice cakes are done.
10. Dip the rice cakes in honey and roll them in the mixture of fruit and nuts.

And there you have it, a VERY easy and quick dessert that you can use all year around to impress people with.


I wish all my reader a Happy Lunar New Year!!!!

I hope that you all have a prosperous year of the snake and that all your dreams and wishes may be fulfilled. But most important of all remember to stay happy, healthy and safe.

I shall blog again tomorrow but remember, that there is no reason why you cannot cook something awesome everyday of the year.